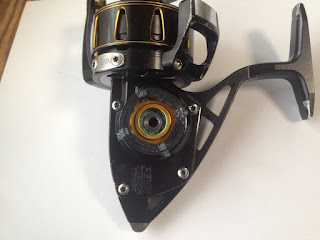
The PENN Torque 5 spinning reel has been one of my favorite reels. I love the reel so much that I even visited the PENN factory in Philadelphia to thank them before I left the United States in 2014 (No. 37). Since I came back to Japan I have often used the reel with two handles attached to it. As described in my past post (No. 244), I call it “double-handlization.” However, I was getting more and more tired of the extra weight of the double-handled reel. These days I often use the reel with just one handle attached to it. And I switch the position of the handle at a fishing spot as necessary. In order to change the position of the handle, first I have to change the positions of two bearing covers. As shown in two of the above photos, one bearing cover is open and the other is closed. And, here is the rub.
(PENNのトルク5スピニングリールは、私のお気に入りのリールのひとつです。すごく気に入っているので、米国を離れる前の2014年、フィラデルフィアにあるPENNの工場を訪れて、お礼を言ったこともありました(No. 37)。日本に帰ってきてからの私は、このリールに2本のハンドルを付けて使うことが多くなりました。過去の投稿(No. 244)で紹介したように、私はそれを「ダブルハンドル化」と呼んでいます。しかし、だんだんとダブルハンドル・リールの重量に嫌気がさしてきたのでした。最近では、ハンドルを1本だけ付けて使うことも多くなっています。そして、必要に応じて釣り場で、ハンドルの位置を変えているのです。さて、ハンドルの位置を変えるためには、まず、2つのベアリングカバーの位置を変えねばなりません。上の写真のように、1つは穴が空いていて、もう1つは穴が空いていません。そして、ここで問題が発生するのです。)
When the handle is attached to the left side of reel (i.e., I crank the reel with my left hand), if the open bearing cover is not appropriately tightened, the rubber seal attached to the handle can loosen the bearing cover and cause a problem. In order to avoid it, I have to tighten the bearing cover firmly, and, once it’s firmly tightened, I will need a proper tool to loosen it. I will need a large plier, preferably with plastic cushions attached to it in order to prevent any scratch on the cover. Obviously, I don't like to carry a large plier with me just to change the position of handle. So I made a tool from a strip of rubber and pieces of fishing line. Using this tool as a grip, I am able to loosen the bearing cover at ease. In addition to this tool, I have made a few improvements to the reel in order to lengthen the longevity of it. Probably I will write about them on my future posts.
(ハンドルがリールの左側に取り付けられている場合(つまり、私が左手でリールを巻く時)、穴の空いているベアリングカバーが適切に締め付けられていないと、ハンドルに取り付けられたゴム製シールがベアリングカバーを緩めてしまい、問題が起きるのです。それを避けるためには、ベアリングカバーをしっかりと締め付けねばならないのですが、しっかりと締めたベアリングカバーを再び緩めるには、適切な工具が必要となるのです。ベアリングカバーに傷がつかないよう、できればプラスチックのクッションが付いた大きなプライヤーが必要になるのです。もちろん、ただハンドルの位置を変えるためだけの目的で、大きなプライヤーを釣り場に持ち込みたくはありません。そこで私は、ゴム片と釣り糸を組み合わせて、ツールを作りました。これをグリップとして用いれば、ベアリングカバーを容易に緩めることができます。このほかにも私は、このリールを長く愛用していくためにいくつかの改良を加えています。それらについては、おそらく今後の投稿で紹介することになるでしょう。)


No comments:
Post a Comment